How to Embed a Calculator on Any Website: 5 Ways Compared
 Odeh Ahwal17 min read

A calculator is one of the few things a visitor will happily spend a few minutes using on your site. Someone checks their mortgage payment, their calorie target or what a project will cost, and they stay, come back and often leave their email. The good news is that adding one no longer takes a developer. This beginner-friendly guide walks you through every way to put a calculator on your website, what each one really costs today, and exactly where to paste the code on the platform you use.
The fastest way to embed a calculator is to copy a ready-made calculator's embed code and paste it into your site's HTML or embed block. You can also install a plugin or app, build one with a no-code builder, code it yourself or with AI, or hire a developer. Each trades speed and cost against how custom the calculator can be.
If you find this article useful, add Calcupedia as a preferred source to see more of our guides in Google. And now, without further ado, let’s dive in.
Key takeaways
- Embedding means pasting a short piece of code (usually an iframe plus a script) into your page.
- A ready-made calculator is the fastest and cheapest route: free to start and live in minutes.
- Plugins and no-code builders suit custom formulas, but you write and check the math yourself.
- AI can write a working calculator, but test the formula before you publish it.
- Every major platform (WordPress, Wix, Shopify, Webflow, Squarespace and more) has a place for embed code.
What does it mean to embed a calculator?
Embedding means showing something that lives on another service inside your own page. You do it with a short piece of embed code: a few lines of HTML you copy from the service and paste into your site. YouTube videos, Google Maps and booking widgets all work this way, and calculators do too.
Most embed codes use one of two building blocks:
- An iframe. A window in your page that loads the calculator from the provider's server. It keeps the calculator's code separate from yours, so it can't break your theme, and your theme can't break it.
- A script tag. A line that loads a small JavaScript file, which then draws the calculator or adjusts the iframe, for example to resize it to its content so there is no scroll bar inside your page.
Many embed codes, ours included, combine the two: an iframe for the calculator and a script that keeps its height right on every screen. Here is what a Calcupedia embed code looks like (your own code contains your personal key):
<iframe data-calcupedia-key="YOUR-KEY" src="https://calcupedia.io/embed/YOUR-KEY"
  title="ROI Calculator" loading="lazy" width="100%" height="600"
  frameborder="0"></iframe>
<script src="https://calcupedia.io/embed-loader.js" async></script>
Two things are worth knowing before you start. First, an embedded calculator doesn't slow your page down much when it loads lazily (the loading="lazy" part above), because the browser only fetches it when the visitor scrolls near it. Second, the calculator itself won't rank in Google for you, since its content sits on the provider's domain. What helps your SEO is what visitors do around it: more time on the page and a reason to link to you.
Before you start: what should your calculator do?
Four quick questions decide which way suits you best. Answer them first and the rest of this guide gets much shorter.
- Is it a standard calculation or your own formula? A mortgage, BMI, ROI or unit converter already exists ready-made. A quote for your exact services and prices needs a formula only you know.
- Do you want leads from it? If the goal is to collect names and emails, you need a lead form and a way to get those leads into your inbox or CRM.
- Does it need to look like your brand? Colors and fonts are easy almost everywhere. Removing the provider's badge usually costs money.
- What is your budget and time? The options below run from free and five minutes to thousands of dollars and several weeks.
Which calculator should you add to your website?
The best calculator answers the question your visitors already have when they land on your page. A buyer on a real estate site wants to know their monthly payment; a reader of a fitness blog wants their calorie target. Here are proven picks by industry, each one ready to embed today:
| Your website | Calculators to add |
|---|---|
| Real estate agents and mortgage brokers | Mortgage Calculator, Home Affordability Calculator, Buy vs. Rent Calculator |
| Property investors | Cap Rate Calculator, ROI Calculator |
| Fitness coaches, gyms and nutritionists | Calorie Calculator, Macro Calculator, BMI Calculator, One Rep Max Calculator |
| Contractors and home services | Square Footage Calculator, Concrete Calculator, Roofing Calculator, Stair Calculator |
| Solar installers | Solar Panel Payback Calculator |
| Financial advisors and finance bloggers | Compound Interest Calculator, Retirement Calculator, Savings Calculator |
| Insurance agents | Life Insurance Calculator |
| Car dealers and lenders | Auto Loan Calculator |
| Businesses, SaaS and agencies | Profit Margin Calculator, Customer Lifetime Value Calculator |
Place the calculator where the question comes up: a mortgage calculator on each listing or on your buyer's guide, a calorie calculator inside your meal-plan article, a concrete calculator next to your quote form. A calculator that sits right beside the answer it gives gets used far more than one hidden on a separate "tools" page.
How to add a calculator to your website? 5 ways
There are five realistic ways to get a calculator onto your site. The table gives you the quick picture; each way is explained below with its benefits and downsides. Prices were checked on each provider's own website in November 2026.
 | Plugin or app | No-code builder | Code it (or AI) | Hire a developer | |
|---|---|---|---|---|---|
| Free to start | Yes, 1 embed | Yes (WordPress) | Yes, capped views | Yes | No |
| Paid from | $1/mo per embed | €29.99 once or $59/yr | $5 to $29/mo | $20 to $25/mo (AI) | $15 to $80/hr |
| Time to go live | Minutes | 1 to 3 hours | 1 to 5 hours | Hours to days | Days to weeks |
| Skill needed | Copy and paste | Plugin setup | Formulas and logic | Code or prompts | None, you brief them |
| Lead capture | From $9.99/mo | In paid versions | On most plans | Build it yourself | Built for you |
| Formulas checked | Yes, by us | By you | By you | By you | By the developer |
| Works on any site | Yes | One platform | Yes | Yes | Yes |
The times for the last four columns are our estimates for a simple calculator; no provider publishes them, and a complex quote calculator takes longer everywhere.
1. Embed a ready-made calculator
The quickest route is to skip building altogether and embed a calculator that already exists. You pick one, match it to your brand, copy the code and paste it into your page. This is what Calcupedia is built for: a library of more than 2,500 calculators, from mortgages and loans to BMI, concrete, payroll and unit conversions, each with formulas checked against published sources before it goes live.
Embedding one takes three steps:
- Pick a calculator. Open the embed customizer and search for the one you need.
- Customize it. Set your colors, corner style, default values and the inputs to show, and choose whether it appears right in your page or as a pop-up that opens from a button. The preview updates as you go.
- Copy and paste the code. Sign up free, copy your embed code and paste it into your page (the platform steps are further down). The calculator resizes itself to fit, so there are no scroll bars inside your page.
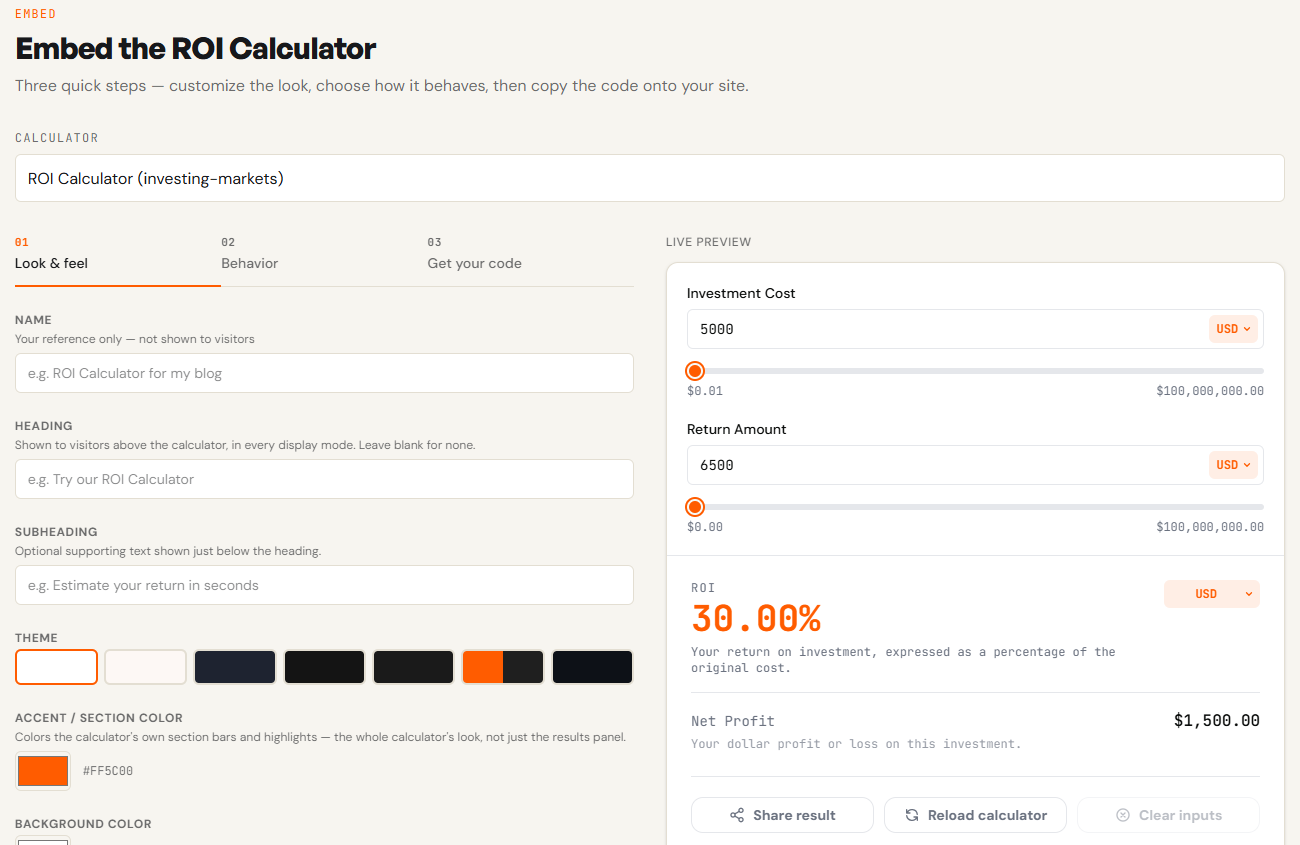
If you want leads, you can add a lead form to any embed on the Creator plan. You choose whether it sits before the results (visitors enter their details to see their numbers) or after the results (visitors see their numbers first, then an offer of help). Each lead arrives in your dashboard and as an email that lists the visitor's name and email, the numbers they entered, their results and the page they used, and you can reply straight from your inbox. You can also send every lead to your CRM with a webhook; our guide to send leads to your CRM covers Zapier, Make and HubSpot. The full walkthrough is on our How It Works page, and every plan is on our pricing page.
Ready-made calculators aren't only ours. Elfsight offers calculator templates you then edit, and some calculator sites give away free widgets for their own tools. The difference is mostly scale and checking: a template is a starting point you still have to fill with your own formula, while a ready-made calculator works the moment you paste it.
Benefits
- Live in minutes
- 2,500+ calculators, formulas checked
- Free to start, $1/mo per embed
- Works on any website
- Leads to email and any CRM
Downsides
- Free plan: 1 embed with our badge
- No fully custom formulas yet
- Lead capture needs Creator ($9.99/mo)
- Styling limited to the customizer
2. Install a plugin or app
If your site runs on WordPress, Shopify or Wix, you can add a calculator from inside your dashboard by installing a plugin (WordPress) or an app (Shopify and Wix). The calculator then lives in your site's own admin, which some people prefer.
On WordPress, two plugins lead the way. Calculated Fields Form has more than 40,000 active installations and a 4.9-star rating from 973 reviews; it is free, and its commercial versions are a one-time purchase starting at €29.99. Cost Calculator Builder by Stylemix has more than 20,000 installations and a 4.5-star rating, with a free version and a Pro license from $59 a year for one site. Both build calculators as forms: you add fields, write the formula and place the form with a shortcode or block.
Shopify and Wix work differently. A search for "calculator" in the Shopify App Store returns 1,785 apps, but most are product-pricing calculators (price by size, area or options), shipping-rate tools or profit dashboards for the store owner. Calconic's Calculator Builder app (4.7 stars, 24 reviews, free plan) is one of the few that builds general calculators. The Wix App Market lists 48 calculator apps; the best reviewed is a price and quote calculator verified by Wix (4.8 stars, 57 reviews), while many of the others have no reviews yet.
Benefits
- Lives inside your dashboard
- Free versions exist
- Deep form features on WordPress
- Store apps fit product pricing
Downsides
- Works on one platform only
- You build and test the formulas
- Updates and site speed are on you
- Many store apps are product-only
3. Build it with a no-code builder
No-code calculator builders let you drag fields onto a canvas, write the formula in a simple editor and publish the result as an embed code. They are the right choice when your calculation is unique to your business, such as a quote for your own services, and you don't want to code. Most of them were built for marketing, so lead forms, email notifications and CRM connections are part of the package.
The catch is in the plans. Free tiers cap how many people can see your calculator each month, removing the builder's badge usually costs extra, and on some tools lead capture or webhooks only start on the higher plans. Here is how the main builders compare today, with Calcupedia for reference. Every formula in a builder is one you write and check yourself:
| Tool | Free plan | Paid from | Leads from | Badge off from | Ready-made calculators |
|---|---|---|---|---|---|
| Calcupedia | 1 embed | $1/mo | $9.99/mo | $1/mo | 2,500+, checked |
| Calconic | 5 calcs, 500 views | $5/mo yearly | $5/mo yearly | $5/mo yearly | Templates |
| Elfsight | 1 widget, 200 views | $5/mo yearly | Free | $5/mo yearly | Templates |
| ConvertCalculator | Up to 100 visits | $20/mo | $40/mo | $20/mo | Templates |
| involve.me | 500 visits | $29/mo yearly | $29/mo yearly | $69/mo yearly | Templates |
| Outgrow | No calculators | $14/mo yearly | Free (forms) | $600/mo yearly | Templates |
| Jotform | 5 forms | $34/mo yearly | Free | $34/mo yearly | Templates |
A few details behind the numbers. Calconic's paid plans start at $5 a month billed yearly ($6 billed quarterly) and remove its brand line. Elfsight includes a post-calculation lead form on every plan, even the free one, but the free plan stops at 200 views a month. ConvertCalculator's cheapest paid plan ($20) includes no form submissions; you need Pro at $40 for that. involve.me starts at $29 a month billed yearly ($49 monthly) and removes its watermark from the Grow plan. Outgrow's free plan covers forms and surveys only, calculators start on its Freelancer plans, and its branding only comes off on the Business plan. Jotform is a form builder whose Form Calculation widget turns any form into a calculator.
A close cousin of the no-code builder is the spreadsheet-to-web tool: you build the calculator in Excel or Google Sheets and the tool turns it into a web page or embed. Calcapp starts at $9 a month (billed yearly) and has a free plan for personal apps, SpreadsheetConverter starts at $15 a month (or $12.75 billed yearly) and Airrange starts at €59 a month. They suit businesses whose pricing already lives in a spreadsheet, and Google Sheets alone can do a simpler version, which we compare in Calcupedia vs. Google Sheets.
Benefits
- Any formula you can describe
- Drag-and-drop, no code
- Lead forms and integrations
- Templates to start from
Downsides
- You write and check every formula
- Free plans cap views (100 to 500/mo)
- Badge removal can cost $69 to $600/mo
- Leads or webhooks on higher plans
4. Code it yourself (or with AI)
A calculator is, at heart, a few input boxes, a formula and a result. If you know HTML and JavaScript, you can write one in an afternoon and paste it into your site like any other embed. If you don't, AI assistants have made this route open to almost anyone: you describe the calculator and get working code back.
Three tools do most of this work today. ChatGPT and Claude both have free plans, ChatGPT Plus and Claude Pro each cost $20 a month, and either can write a self-contained calculator you paste into a Custom HTML block. Lovable goes further and builds and hosts a small web app for you; its free plan gives 5 build credits a day, and its Pro plan ($25 a month) adds custom domains and removes the Lovable badge. We compare each one in detail: Calcupedia vs. ChatGPT, Calcupedia vs. Claude and Calcupedia vs. Lovable.
The risk is the one nobody sees: a formula that looks right but isn't. AI code runs, shows a neat number and still uses the wrong compounding period, a monthly rate where a yearly one belongs, or a tax rule from another country. If the calculator gives your visitors financial, health or construction numbers, check it against a trusted source with several real examples, including edge cases like zero, very large values and negative entries. You'll also need to handle hosting, mobile layout and, if you want leads, somewhere for the form submissions to go.
Benefits
- Full control over everything
- AI writes a first draft fast
- Cheap: free to $25/mo for AI
- No badge, no view limits
Downsides
- You must check the math yourself
- Hosting, mobile and fixes are on you
- Leads need a form backend
- Every change means editing code
5. Hire a developer
When your calculator is complex, such as a multi-step quote that pulls live prices, books a slot or writes into your CRM and invoicing, a developer is often the right call. They build exactly what you describe, wire it into your other tools and hand you a finished result.
The cost depends on who you hire. On Upwork, freelancers who list calculator development in their profiles charged from about $15 to $80 an hour when we checked in November 2026, and general web developers start lower. A simple calculator might take a few hours; a quote tool connected to your systems can take weeks. For context, the median pay for web developers in the U.S. was $92,650 a year in May 2025, according to the U.S. Bureau of Labor Statistics. Keep in mind that every later change, from a new price to a new field, is another paid job. Our page on hiring a developer vs. Calcupedia walks through when each makes sense.
Benefits
- Exactly what you want
- Connected to your other tools
- No platform limits
Downsides
- The most expensive way
- Takes days or weeks
- Every change costs again
- Quality varies by developer
How to add an embed code on your site? (by platform)
Whichever way you choose, you end up with a piece of embed code. Here is where it goes on the most popular website platforms. The steps come from each platform's own help pages, checked in November 2026.
WordPress
In the block editor, add a Custom HTML block (click the block inserter, or type /html and press Enter), click Edit HTML, paste your code and click Update. Then preview or publish the page.
Two limits to know. On your own WordPress install, iframes and scripts are only kept for users with the unfiltered_html permission, which administrators have on a standard site; for other roles WordPress strips them out. On WordPress.com, iframes and scripts need a paid plan with hosting features active.
Elementor
Elementor's free version includes an HTML widget made for this. In the Elementor editor, search the widgets panel for "HTML", drag the HTML widget into your section, paste your code into its code box and publish the page.
Google Sites
Open your site, click Insert on the right, then Embed. Choose Embed code, paste your code and click Next, then Insert. Resize the box on the page if needed and click Publish at the top right.
Webflow
Copy your code, open the Add panel and drag a Code Embed element onto the canvas. Paste your code, then save and close. The Code Embed element needs an active Site plan or a Core, Growth, Agency or Freelancer Workspace, and each element holds up to 50,000 characters.
Shopify
For a page or blog post, open it in your Shopify admin and use the rich text editor's HTML view: click the HTML button in the editor's toolbar, paste your code where you want the calculator and save. Shopify notes that pasted HTML can cause display issues, so preview the page before you publish.
Wix
In the Wix Editor, click Add Elements (the + on the left), choose Embed Code and then Embed HTML. Click the new box, click Enter Code, paste your code and save it (the button reads Apply or Update, depending on your editor version). Drag the box to the size you want and publish. Wix shows embeds inside a frame of fixed size, so make the box tall enough for the whole calculator, and it only displays code that loads over HTTPS.
Squarespace
Edit your page, click Add block and choose Code. Click the pencil icon on the block, check the mode is set to HTML, paste your code and save. Code blocks run JavaScript and iframes only on the Core, Plus and Advanced plans.
Framer
Open the Insert menu, search for Embed and drag the Embed component onto the canvas. Paste your code into its HTML section and resize the component to fit.
HubSpot
Open the page or blog post, click into a rich text module, open the Insert menu and choose Embed. Paste your embed code and click Insert. HubSpot doesn't support embeds with a script tag at full width, so keep the module at a normal width.
How do you test and fix an embedded calculator?
Pasting the code is most of the job, but a two-minute check makes sure your visitors see what you see. And if something looks wrong, the cause is almost always one of a handful of small things.
Check it after you publish
Once the page is live, test it the way a visitor would:
- Run a known example. Enter numbers you know the answer to and compare the result.
- Open the page on your phone. The calculator should fit the screen with no sideways scrolling and no scroll bar of its own.
- Send yourself a test lead if you added a lead form, and check it reaches your inbox or CRM.
- Look at it in a private window, so you see the page without your login or cached files.
Why isn't my calculator showing?
If the calculator doesn't appear, or looks wrong, work through these causes in order:
- The platform removed the code. Some platforms strip iframes and scripts unless your plan or role allows them: WordPress.com needs a paid plan with hosting features active, a self-hosted WordPress user needs the
unfiltered_htmlpermission, Webflow's Code Embed needs a paid Site plan or Workspace, and Squarespace code blocks run iframes only on the Core, Plus and Advanced plans. Open the block again: if your code is gone or cut short, this is the reason. - It has a scroll bar or gets cut off. The script line was probably left out or removed. Paste the full code, including the script tag, and the calculator sizes itself to its content.
- It shows in the editor but not on the live page. You may be looking at a cached copy. Republish the page, clear your caching plugin or CDN, and check again in a private window.
- It worked, then stopped. Check your plan limits. Calcupedia's free plan runs one active embed, Elfsight deactivates a widget for the rest of the month once its view limit is passed, and ConvertCalculator disables calculators two days after a plan's monthly visit limit is reached.
- It shows a blank box. Make sure you pasted the code in an HTML or embed block, not a normal text block, which shows the code as text or drops it.
Which way is best for you?
For most small websites, the easiest and most affordable way is to embed a ready-made calculator: it is free to start, live in minutes and needs no formula work. Pick a different route when your situation calls for it:
- You need a standard calculator (mortgage, loan, BMI, ROI, construction, conversions): embed a ready-made one.
- You run WordPress and want it inside your dashboard: install a plugin such as Calculated Fields Form.
- Your formula is unique to your business and you want lead forms built in: use a no-code builder, and budget for the plan that removes the badge.
- You can code, or want to try AI: build it yourself, and test the math before you publish.
- It needs to connect to your pricing, booking or invoicing systems: hire a developer.
Conclusion
Adding a calculator to your website used to mean hiring someone. Today you have five real choices, from pasting a ready-made calculator in a few minutes to building your own with a no-code tool, AI or a developer. The right one depends on how custom your formula is, whether you want leads, and how much time and money you want to spend. Whichever you pick, the last step is the same: copy the embed code and paste it into your page using the steps above.
If a standard calculator covers what your visitors need, the quickest way to see it on your own site is to pick a calculator and customize it. It's free to start, and you'll know in a few minutes whether it fits.
Found this guide helpful? Share it with a friend or client who has been meaning to add a calculator to their site. Sharing is caring!
Found this useful? Add Calcupedia as a preferred source to see more of our guides in Google.
Frequently asked questions

Written by
Founder of Calcupedia. A serial internet solopreneur with a 10x exit track record.